Overview
Dashboardly lets you export your data to CSV files so you can analyze it in Excel, Google Sheets, or any other spreadsheet tool. This is useful for sharing reports with your accountant, doing custom analysis, or keeping offline records.
What You Can Export
Dashboardly lets you export several types of data to CSV. Each page with an Export CSV button in its top-right corner supports self-serve export:
| Page | What you get |
|---|---|
| Orders | Order-by-order list with amounts, costs, profit, and status |
| Customers | Customer list with segments, lifetime value, and order counts |
| Inventory | Your product and SKU list with unit costs, FBS shipping costs, and stock levels |
| Profit & Loss | Full P&L breakdown for the selected date range (revenue, fees, costs, profit lines) |
| Sales & Profit | Per-product sales and profit metrics for the selected date range |
| Product Overview (individual product page) | Metrics for that single product |
| Warehouse | Warehouse fee breakdown (if you use warehouse management) |
The Orders and Customers exports are covered in detail below. For the other pages, the flow is the same: set the date range and filters you want, then click Export CSV in the top-right. Your browser downloads the file immediately.
Orders Export
Export your order list from the Orders page.
Columns included:
- Order ID
- Date (order date and time)
- Customer
- State (shipping destination)
- Type (FBS or FBT)
- Products (name and quantity for each item in the order)
- Total Amount
- Costs & Expenses
- FBS Shipping
- Net Profit
- Status (delivered, in transit, cancelled, etc.)
Customers Export
Export your customer list from the Customers page.
Columns included:
- Customer ID
- Name
- Segment (VIP, Regular, New, or Churned)
- Orders (total count)
- Last Order ID
- Historical LTV
- Projected LTV (12 months)
- Average Order Value (AOV)
- First Order Date
- Last Order Date
Step-by-Step Guide
Exporting Orders
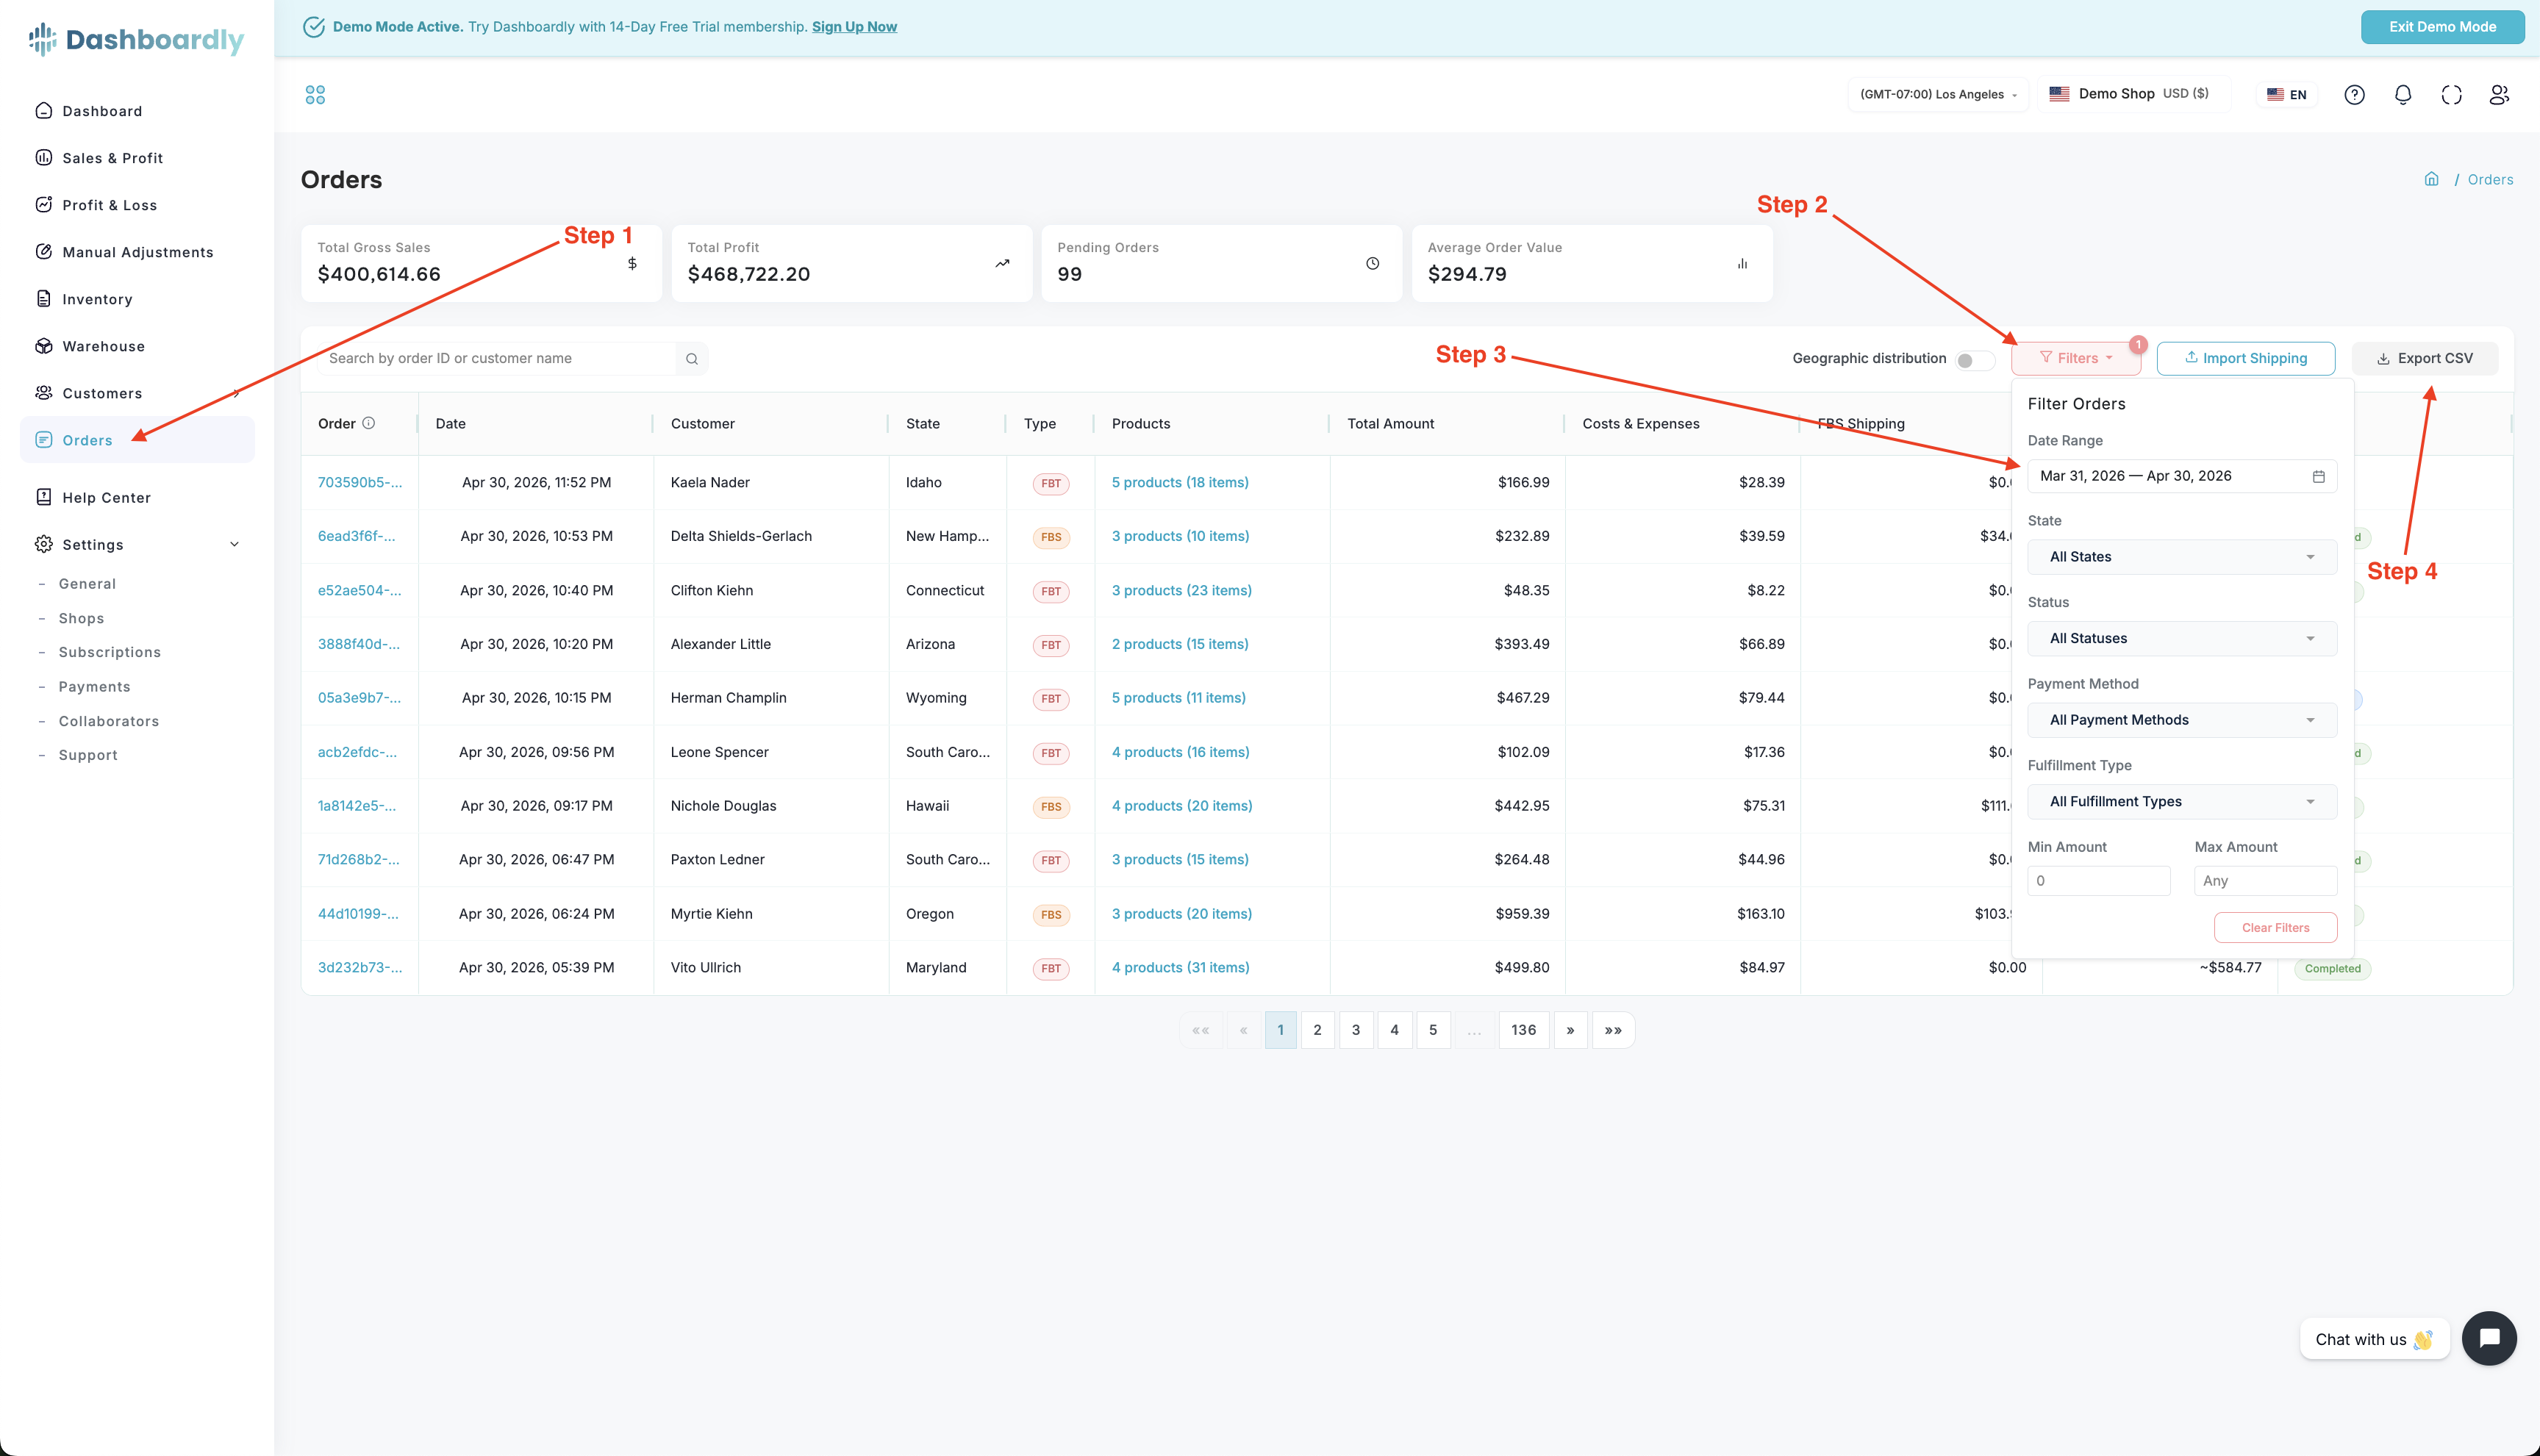
Navigate to Orders in the left sidebar.
Click the Filters button in the top-right of the page (next to Import Shipping and Export CSV). A panel opens with all available filter options.
Inside the Filters panel, set:
- Date Range -- only orders within this range will be included in the export
- State -- shipping destination state
- Status -- order status (e.g., delivered, in transit, cancelled)
- Payment Method
- Fulfillment Type -- FBS or FBT
- Min Amount / Max Amount
You can also use the Search bar above the table to filter by order ID or customer name. The export reflects whatever is currently filtered.
Click the Export CSV button in the top-right of the page. Your browser downloads a CSV file containing the filtered order data.
Exporting Customers
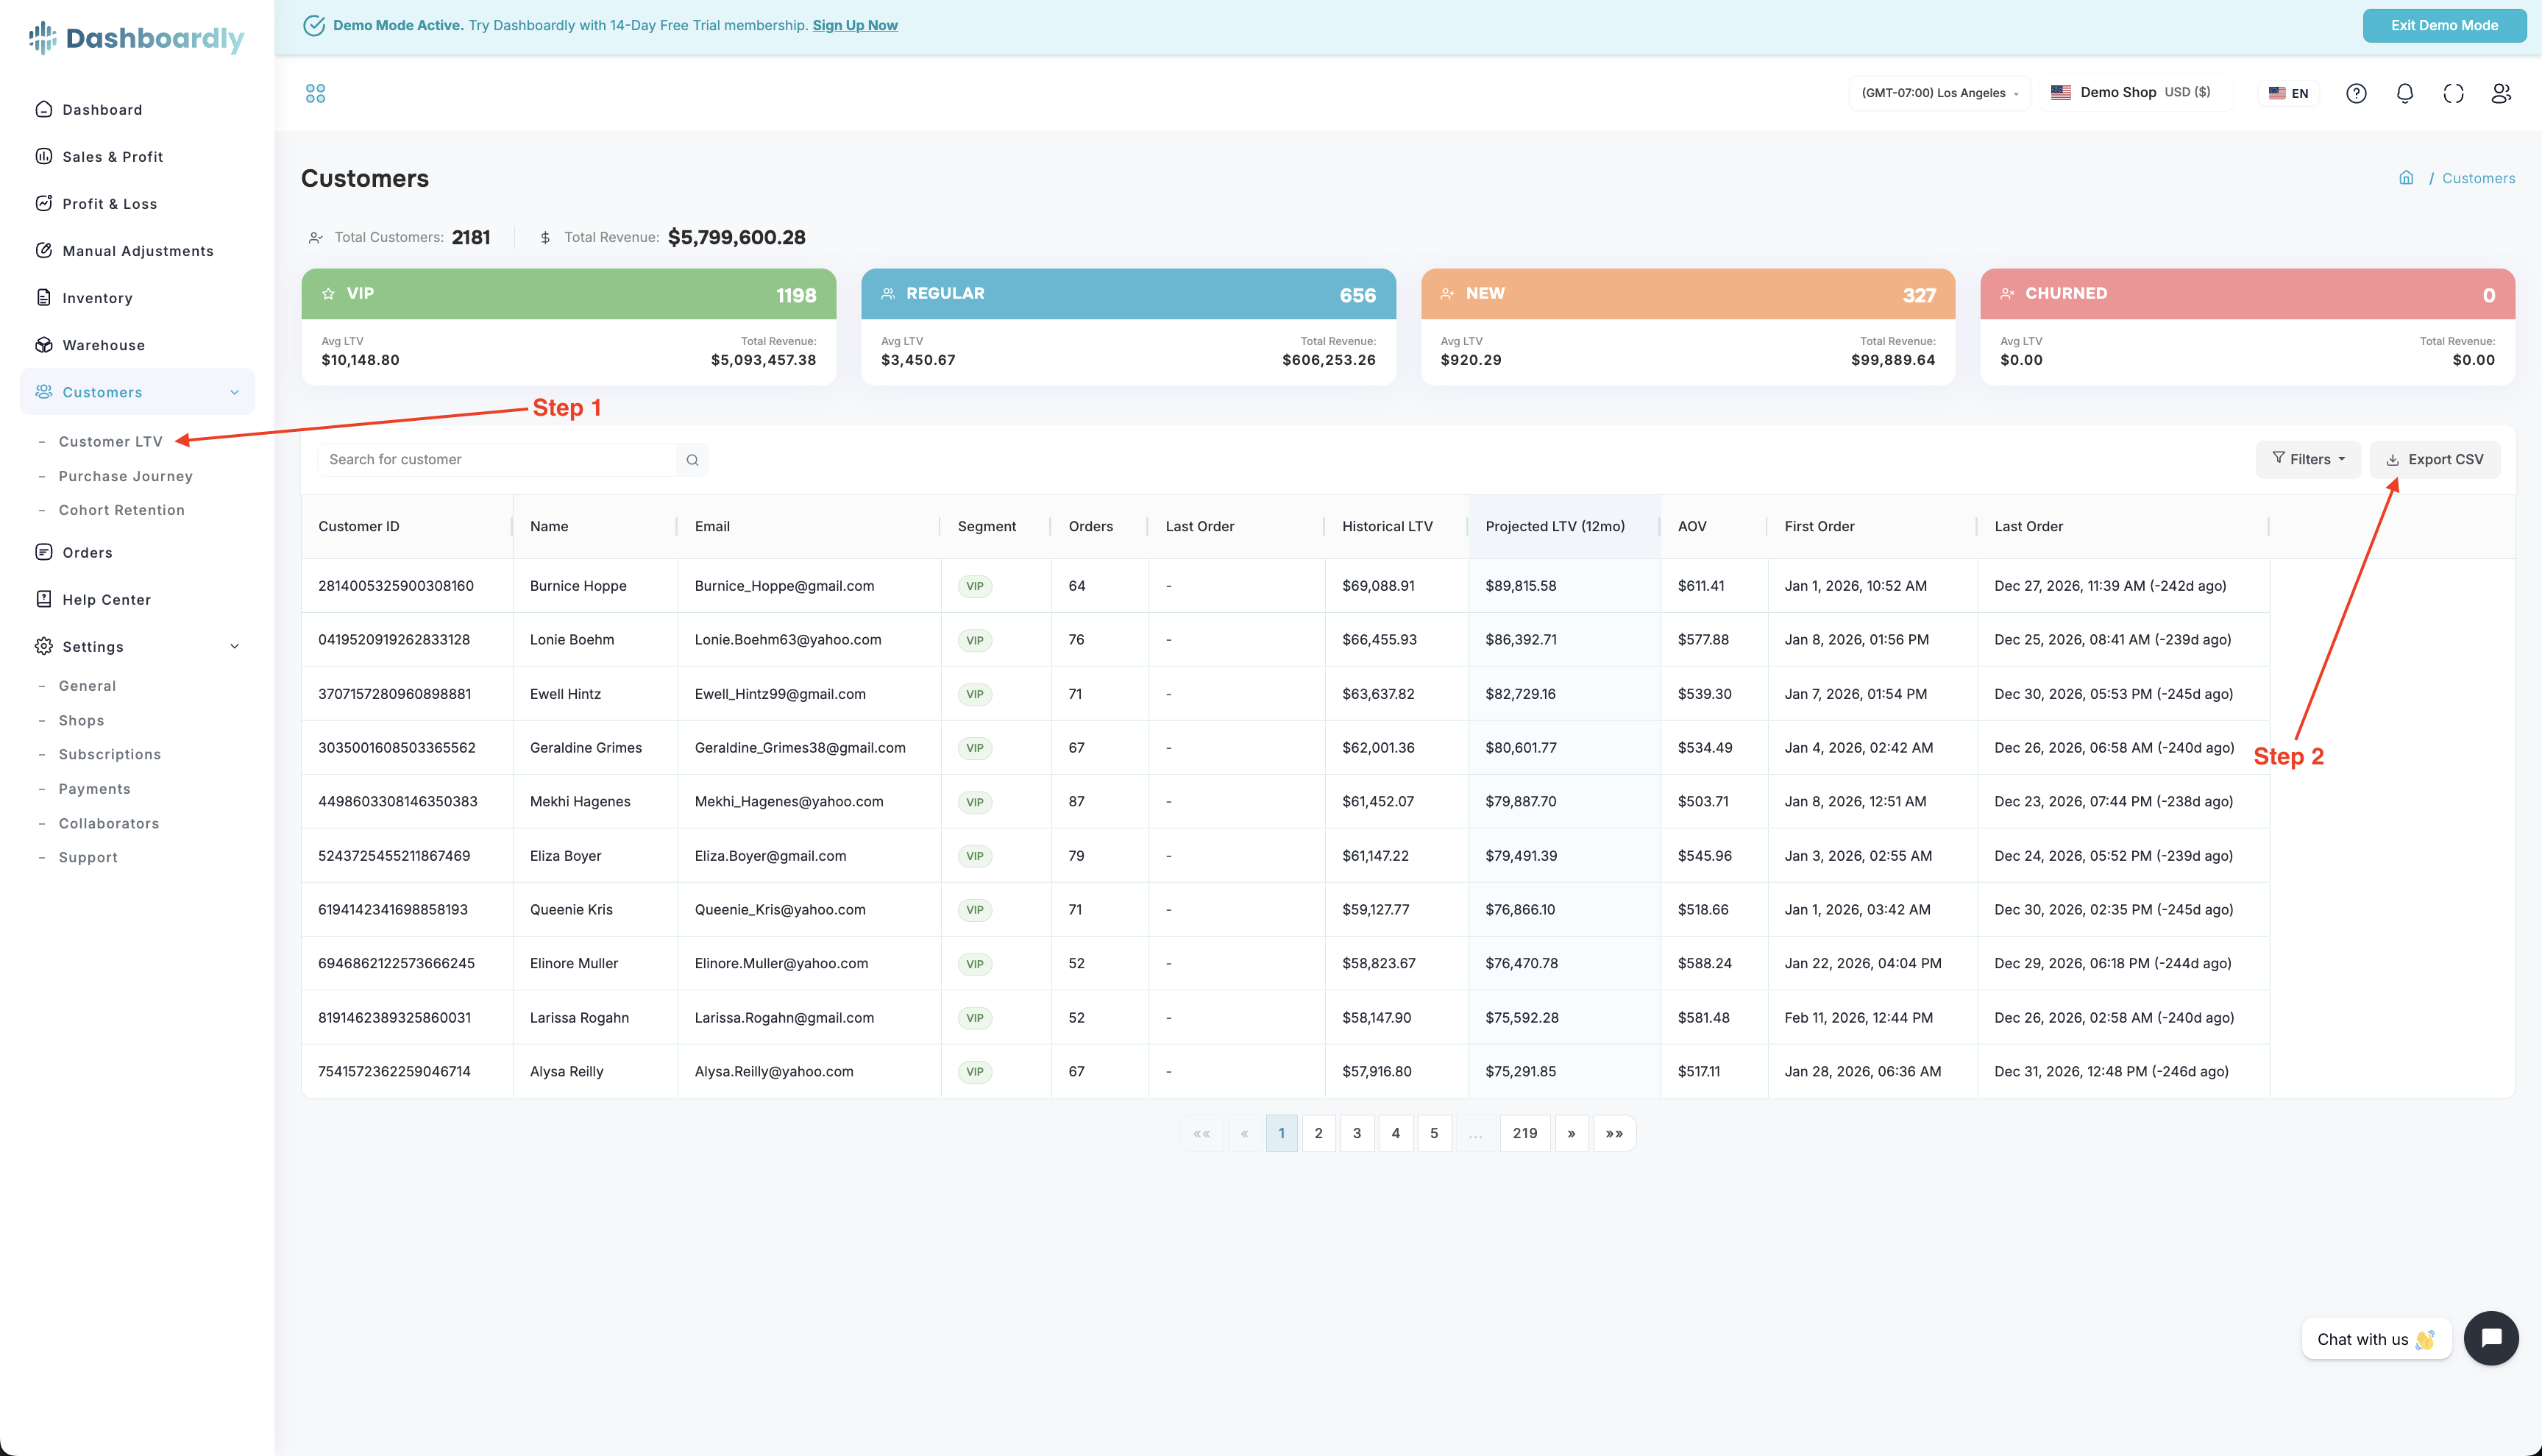
Navigate to Customers in the left sidebar.
Click the Export CSV button to download your customer data.
Exporting Other Data (Inventory, P&L, Sales & Profit, Warehouse, Product)
The same pattern works on every page with an Export CSV button:
- Navigate to the page (Inventory, Profit & Loss, Sales & Profit, Warehouse, or an individual Product page).
- Set the date range and any filters you want to apply. The location of the date range varies by page -- on some pages it sits in the page header, on others (like Orders) it lives inside the Filters panel.
- Click the Export CSV button in the top-right of the page.
The exported file contains the data as shown in the page's table view -- if you filter the view, the export reflects those filters.
Column behavior varies by page:
- Customers, Product Overview, and Warehouse export only the columns currently visible in the table -- hide or show columns to control what's included.
- Orders and Sales & Profit always export the full column set.
- Profit & Loss and Inventory use a fixed column set defined by the server.
Tip: For P&L exports in particular, set the exact date range you need (month, quarter, or year) before exporting, since the CSV reflects that range's numbers.
Tips
- Filter before exporting. To keep your file manageable, filter by date range or status before exporting instead of downloading everything at once.
- Use the date range. Exporting a month at a time is easier to work with than exporting a full year.
- Open CSV files in Google Sheets if Excel misformats dates or special characters. Google Sheets handles CSV imports more reliably.
- Save exports for tax season. Regular monthly exports give you clean records for your accountant.
Common Issues
CSV file is empty
- Check that you have data in the selected date range. Try expanding the date range.
- Make sure you have orders or customers in your account. If your shop was recently connected, wait for the import to complete first.
Numbers look wrong in Excel
When opening a CSV in Excel, some number columns (like order IDs) may be reformatted. To avoid this:
- Open Excel first.
- Go to Data > From Text/CSV.
- Import the file and set long number columns to "Text" format.
Alternatively, open the CSV in Google Sheets, which handles this automatically.
Export is taking a long time, or fails for large date ranges
For very large date ranges (tens of thousands of rows), exports may take up to a minute to generate. The file will download automatically when ready. If an export fails or looks incomplete, narrow your date range or filters and export in smaller chunks.
Some orders are missing from the export
- Check that your date range includes the orders you expect.
- Check your filters. Active filters limit which orders appear in the export.
- Orders that are still being imported may not appear. Wait 5-10 minutes for a recent import to complete, then try again. If orders still appear missing after an hour, contact support@dashboardly.io.